Most itineraries fail in the same way. They’re a list of things to see, written in the order you found them online, with no idea how far apart they are or how long they take. By day two you’re crossing the city three times and eating lunch at four.
A good day by day itinerary works the other way round. You place the fixed bookings first. You give each day one main plan. You group the rest by area, add travel time and leave room to breathe. Then you check where you’re sleeping each night.
That’s the whole method. Below, we break it into eight steps and show it working on a real four-day trip.
Every planner mentioned in this guide is made and sold by Taskdale.
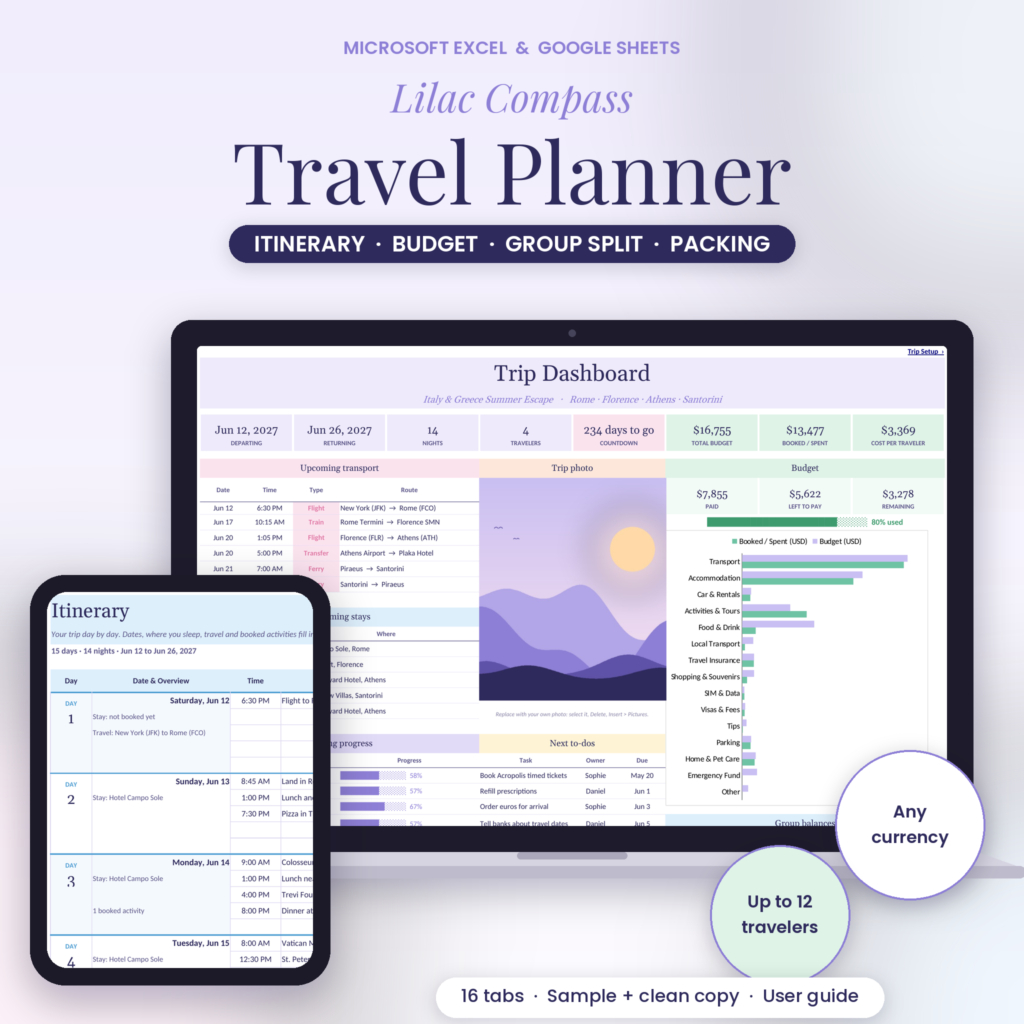
Best for itineraries with lots of moving parts. 60 days with five time slots each, and every day shows where you’re sleeping, how you’re traveling and how many activities are booked.
See it on Taskdale →Step 1: Put the fixed things in first
Start with anything that has a set time and can’t move. Flights. Trains. Check-in and check-out. Timed tickets for museums or tours. A dinner reservation.
These are the walls of your itinerary. Everything else fits around them. If you land at 15:20, day one is not the day for a big museum. If your train to the next city leaves at 09:39, you’re not starting that morning with a market tour across town.
In the Postcard Travel Planner, the Bookings Calendar puts every booking on a month view, and each itinerary day shows the night’s stay from your hotel or rental bookings. In Lilac Compass, transport, stays, rentals and activities each have their own tracker, and each itinerary day shows your travel, where you’re sleeping and how many activities are booked.
Step 2: Give each day one main plan
Pick one thing per day that would make the day worth it on its own. A day trip. A big museum. A long walk through an old neighbourhood. A beach.
This is the plan you protect. If the weather turns or someone’s tired, the other stops can go. The main one stays. Most people find that one anchor plus two or three smaller things is plenty for a day abroad, especially with children.
Step 3: Group everything else by area
Now open a map and look at where your “maybe” list sits. You’ll usually find clusters. Three of your stops are near the river. Two are in the old town. One is out on its own.
Put the clusters on the same day as the main plan they’re closest to. This one change cuts more wasted time than anything else on this list. If a stop sits out on its own and isn’t a main plan, think hard about whether it’s worth half a day of travel.
Step 4: Add realistic travel time
Every move between places takes longer than the map says. You get lost leaving the metro. The bus is full. Someone needs the bathroom. Add 15 to 30 minutes to every transfer inside a city, and an hour to anything involving luggage.
Write the travel into the itinerary as its own line, with a time. It looks fussy, but it’s the line that tells you whether your day actually fits.
Step 5: Leave a gap every day
Plan a free block each afternoon, even just two hours. Use it to rest, wander or catch the thing you ran out of time for in the morning. If the day goes perfectly, the gap becomes a long lunch. If it goes badly, the gap saves it.
Step 6: Put a cost next to each plan
An itinerary with prices attached is also a budget. Add the ticket price, the transport fare and a rough food figure to each day. You’ll see quickly if one day costs three times the others, and whether that’s fine or a mistake.
Atlas Bloom’s daily itinerary has a column for estimated costs on each of its 60 day blocks. Lilac Compass lets you set a daily spending target and shows red bars on days you go over.
Step 7: Check where you sleep each night
Go through the trip day by day and confirm each night has a bed booked. It sounds obvious. It’s also the most common gap in a self-planned trip, usually on the night between two cities, or the night you arrive after midnight.
Both Postcard and Lilac Compass show the night’s stay on every itinerary day, pulled from your accommodation bookings. A missing night stands out as a blank.
Step 8: Save it offline or print it
Your itinerary has to work without data. Save the file to your phone, export the key days as a PDF or print them. Postcard includes printable Day View and Daily Plan pages. Every tab in Lilac Compass has a print area set to fit US Letter or A4.
A worked example: 4 days in Lisbon
Here’s how those eight steps turn into a real plan. A couple arrives in Lisbon on a Thursday afternoon and leaves Monday morning.
Day 1: Arrive and settle in
| Time | Plan | Notes | Cost |
|---|---|---|---|
| 15:20 | Land at Lisbon airport | Metro to city centre | $8 |
| 17:00 | Check in, Alfama guesthouse | Booked, paid | Paid |
| 18:30 | Short walk around Alfama | No plan, just look | Free |
| 20:00 | Dinner near the guesthouse | Book a table if it’s a weekend | $55 |
The first day is short on purpose. After a long flight, nobody wants a schedule.
Day 2: Old Lisbon on foot
| Time | Plan | Notes | Cost |
|---|---|---|---|
| 09:30 | São Jorge Castle (main plan) | Go early, before the queues | $32 |
| 12:00 | Lunch in Alfama | $40 | |
| 13:30 | Free block | Rest at the guesthouse | Free |
| 16:00 | Walk down to Baixa and the river | Same area, all downhill | Free |
| 19:30 | Dinner with fado | Reserved, 8 PM seating | $110 |
Everything sits in one part of the city, so there’s almost no transport.
Day 3: Day trip to Sintra
| Time | Plan | Notes | Cost |
|---|---|---|---|
| 08:45 | Train from Rossio to Sintra | About 40 minutes | $10 |
| 10:00 | Pena Palace (main plan) | Timed ticket booked | $46 |
| 13:00 | Lunch in Sintra town | $45 | |
| 14:30 | Quinta da Regaleira | Only if energy allows | $26 |
| 17:30 | Train back to Lisbon | $10 | |
| 20:00 | Light dinner near the guesthouse | $35 |
Day trips need the most structure: a train time out, a timed ticket, a train time back. Note the second stop is marked “only if energy allows.” That’s the gap from step 5 doing its job.
Day 4: Belém and a slow last evening
| Time | Plan | Notes | Cost |
|---|---|---|---|
| 10:00 | Tram or bus to Belém | $6 | |
| 10:45 | Jerónimos Monastery (main plan) | $22 | |
| 12:30 | Pastries and lunch in Belém | $30 | |
| 14:00 | Riverside walk to the Belém Tower | Free | |
| 16:00 | Free block | Free | |
| 19:00 | Last dinner in Bairro Alto | $70 |
Day five is a 07:30 airport taxi, so day four ends early.
Add up the cost column and the four days come to about $545 for two people, before the stays. That’s the number to put in your budget’s activities and food lines.
Changing the plan once you’re there
No itinerary survives the first rainy morning intact. That’s fine, as long as you know how to bend it.
- Swap days, don’t squeeze them. If day two is a washout, trade it with the museum day instead of trying to fit both into day three.
- Drop the extras first. The smaller stops exist so you can let them go. Protect the main plan.
- Update the planner the same evening. Two minutes before bed stops you turning up tomorrow for a tour you moved.
- Check what a change costs. Moving a timed ticket or a train can carry a fee. Look at the booking before you decide.
In a spreadsheet, moving a plan to another date shifts it to the new day on its own. In a handwritten planner, keep a pencil-style layer, or leave a line free each day for changes.
Mistakes that make an itinerary feel rushed
- Planning the arrival day like a full day. You’ll lose half of it to travel and tiredness.
- Two main plans in one day. One of them always suffers.
- Crossing the city twice. Group by area, every time.
- No buffer before a train or flight. Missing one costs far more than an empty hour.
- Forgetting opening days. Check them for every main plan. Plenty of museums close one day a week.
Planning an itinerary for a group
With four or more people, the itinerary needs two more columns: who’s going and who booked it. Not everyone wants the same day. Some groups split for an afternoon and meet for dinner. Write that down, or someone will end up waiting at the wrong door.
Postcard handles up to 8 travelers and up to 8 plans per day. Lilac Compass handles up to 12 travelers, and its activities tracker logs 50 bookings with their payment status. If the group is also sharing costs, the spreadsheets keep track of who paid for which ticket, which saves an awkward conversation at the end.
Two planners that build the itinerary for you
| Planner | Format | Works in | What’s inside | Best for | |
|---|---|---|---|---|---|
| Lilac Compass Travel Planner $5.79 · Up to 12 travelers | Excel spreadsheet, 16 tabs | Excel (Windows, Mac, 365), Google Sheets | 60-day itinerary, booking trackers, per-person budget, group split with settle-up steps | Big groups sharing costs | View |
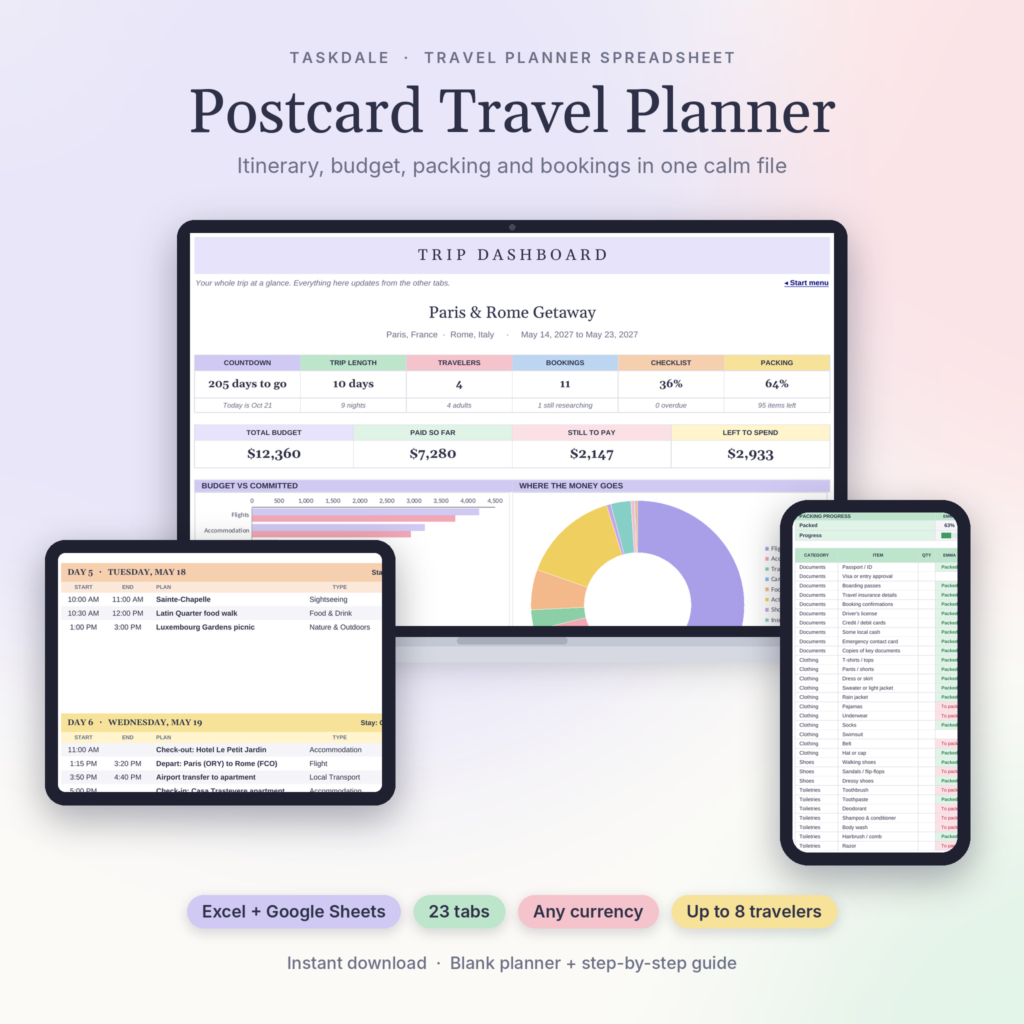 Postcard Travel Planner $9.99 · Up to 8 travelers | Excel spreadsheet, 23 tabs | Excel 2019+, Microsoft 365, Google Sheets | Smart itinerary with clash warnings, budget, expense split, packing list, 39-task checklist | Families and groups who want one file for everything | View |
Prices as listed on Taskdale in October 2026.
A day-by-day itinerary that fills itself from your transport, stays and activities.
Good for: Groups of up to 12 and trips with lots of separate bookings
What it does well- ✓ 60 days with five time slots per day
- ✓ Each day shows sleeping location, travel and booked activities
- ✓ Print areas set for US Letter and A4
- • Five slots a day is tight if you like to plan by the hour
- • Exchange rates are typed in by hand
Add a plan once and it lands on the right day, sorted by time, with a warning if two plans clash.
Good for: Families and couples who want the itinerary, budget and bookings in one file
What it does well- ✓ Red clash warning for overlapping plans
- ✓ Shows the night’s stay on every day
- ✓ Printable Day View and Daily Plan pages
- • Up to 8 plans per day
- • Needs Excel 2019 or newer, or Google Sheets
FAQ
How detailed should a day by day itinerary be?
Detailed enough to include fixed times, travel between places and where you sleep. Loose enough to leave a free block every day. One main plan and two or three extras is a good level for most trips.
How many things should I plan per day?
One main plan and up to three smaller ones. On arrival days and the day before a long journey, plan less.
What’s the best format for an itinerary?
A spreadsheet works best if you want costs, bookings and group details connected. A handwritten tablet planner is nicer to flick through on the go. See our comparison of travel planners vs itinerary apps if you’re also weighing up an app.
Should I share my itinerary with someone at home?
Yes. Send the key details (flights, where you’re staying each night, and your insurance number) to one person you trust. A PDF export of the itinerary is the easiest way.
When should I start building my itinerary?
Start sketching it once your flights and first stays are booked, usually two to three months out for a big trip. Our trip planning timeline has the full schedule.
The verdict
Fixed bookings first, one main plan per day, grouped by area, with travel time and a free block. That’s the method. The planner just makes it easier to see.
For a big group or a trip full of separate bookings, use Lilac Compass. For a family trip where you want the clash warnings and the budget in the same file, use Postcard. Want to compare all four Taskdale planners? Start with our guide to the best travel planners.